Connect with us

Fashion and Lifestyle

What Is a Jelly Pedicure? The Latest Spa Trend You Need to Try!

Get ready to pamper your feet with the latest spa trend – a jelly pedicure!

Published

on

jelly pedicure spa trend

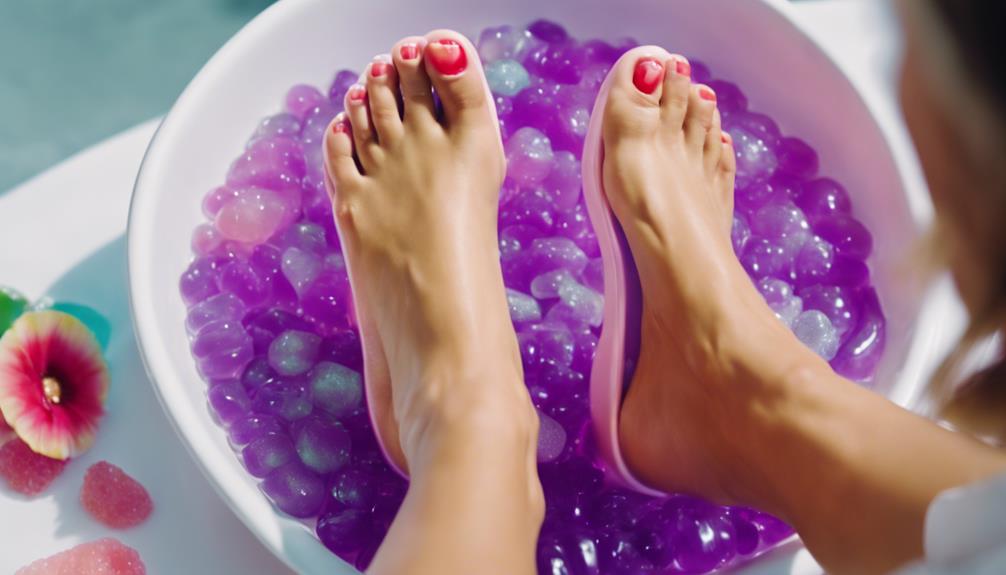
Experience the newest spa craze: a jelly pedicure! Immerse yourself in a hydrating, calming, and revitalizing foot treatment. Your feet soak in a jelly blend for ultimate indulgence. Enjoy smooth skin, nail maintenance, a mild exfoliation, a comforting massage, and polished nails. This 45-60 minute session costs $40 to $70. Sustain foot well-being with regular visits. Clients adore the enhanced foot condition, relaxation, and improved appearance. Guarantee salon cleanliness and FDA-certified products for a secure experience. Explore the advantages of jelly pedicure for yourself!

Key Takeaways

  • Hydrates, softens, and rejuvenates feet with a jelly mixture.
  • Includes nail care, gentle scrub, massage, and polish application.
  • Lasts 45-60 minutes for a pampering experience.
  • Cost ranges from $40 to $70 per session.
  • Regular maintenance every 4-6 weeks for foot health and relaxation.

Benefits of Jelly Pedicure

Indulge in the luxurious benefits of a jelly pedicure for hydrated, relaxed, and rejuvenated feet. A jelly pedicure not only moisturizes and exfoliates the skin but also provides much-needed stress relief and relaxation. The soothing properties of the jelly mixture help to soothe tired feet, leaving them feeling refreshed and revitalized.

Additionally, the overall appearance of your feet will be enhanced, giving you smooth and soft skin that you'll love to show off.

With a jelly pedicure, you can expect to experience a pampering session that takes around 45-60 minutes, depending on the salon. Prices may vary, but the indulgent experience is well worth it, especially for special occasions or just as a treat for yourself.

After your jelly pedicure, remember to keep your feet moisturized between treatments, trim your nails regularly, and follow salon recommendations to maintain the benefits. Your feet will thank you for the care and attention, and you'll likely find yourself coming back for more of this luxurious experience.

Process of Jelly Pedicure

luxurious jelly foot treatment

During a jelly pedicure, your feet are immersed in a softening jelly mixture, creating a luxurious spa experience. This unique pedicure takes your typical foot treatment to the next level by incorporating a jelly soak that helps to soften the skin and relax your feet.

The process involves various steps such as nail shaping, cuticle care, a gentle scrub to exfoliate rough skin, a soothing massage to relieve tension, and finally, the application of your chosen nail polish for a polished look.

Advertisement

Jelly pedicures usually last between 45 to 60 minutes, offering ample time for you to unwind and enjoy the pampering session. The prices for jelly pedicures can vary depending on the salon and any additional treatments you opt for.

To maintain the benefits of a jelly pedicure, ensuring to keep your feet moisturized, trim your nails regularly, avoid using harsh chemicals, and follow the salon's recommendations for proper upkeep. Clients often report softer, smoother feet, improved foot health, relaxation, and a sense of indulgence after experiencing a jelly pedicure.

Duration and Cost

duration and financial implications

Experience a jelly pedicure session typically lasting between 45 to 60 minutes, offering your feet a luxurious and relaxing treat.

The cost of a jelly pedicure can vary, ranging from $40 to $70 depending on the salon and location. Additional services like nail art or special designs may come with extra charges during your jelly pedicure experience.

To maintain the softness and smoothness of your feet, it's recommended to schedule a jelly pedicure once every 4-6 weeks.

Before booking your appointment, make sure to check with the salon for specific pricing details and inquire about any promotions or discounts available for jelly pedicures.

Advertisement

Keeping up with regular sessions will help you enjoy the full benefits of this spa trend while ensuring your feet remain pampered and healthy.

Maintenance and Aftercare

maintenance is key

To maintain the softness and hydration of your feet post-jelly pedicure, keeping them moisturized regularly is crucial.

Make sure to trim your nails and care for your cuticles to promote overall foot health.

Avoid using harsh chemicals that can strip moisture away, and follow salon recommendations for best aftercare outcomes.

Aftercare Tips

Regularly moisturize your feet to maintain softness and hydration post-jelly pedicure. This simple step takes only a few minutes each day but can make a significant difference in preserving the effects of your Jelly Pedicure.

After your treatment, avoid hot water for the next 24 hours to prevent skin dryness and maintain the benefits of the pedicure. Additionally, remember to apply sunscreen on exposed skin, especially after exfoliation during the pedicure, to protect it from harmful UV rays and maintain the health of your feet.

Advertisement

To ensure your feet stay in top condition, consider maintaining regular pedicure appointments. These appointments not only keep your feet looking and feeling great but also contribute to ongoing foot health.

Lastly, following your technician's advice for foot health is essential in maximizing the long-lasting benefits of the jelly pedicure while promoting overall foot wellness. By incorporating these aftercare tips into your routine, you can enjoy beautiful and healthy feet for longer.

Maintaining Foot Health

For best foot health maintenance and aftercare following a jelly pedicure, prioritize consistent moisturization to retain softness and hydration. Keeping your feet well-moisturized between jelly pedicure sessions is essential for maintaining the benefits of the treatment.

Regularly trim your nails and care for your cuticles to guarantee healthy foot growth and appearance. Avoid using harsh chemicals on your feet as they can damage the skin and undo the effects of the jelly pedicure.

It is vital to follow the salon's recommendations for foot upkeep to extend the longevity of your jelly pedicure results. This includes scheduling regular appointments to keep your feet in top condition and to continue pampering yourself.

Advertisement

Customer Satisfaction

customer centric business success

Customers frequently express high satisfaction levels with jelly pedicures due to the noticeable improvement in foot condition and the indulgent experience they provide. Many clients report softer and smoother feet after indulging in this unique spa treatment.

Positive reviews often highlight the relaxation and pampering experience that comes with a jelly pedicure, making it a favorite among those seeking a luxurious treat for their feet. Not only do customers enjoy the immediate benefits of softer skin and well-groomed nails, but some also mention improved foot health as a result of regular jelly pedicures.

The unique and luxurious experience of a jelly pedicure often encourages repeat visits, with many clients opting for regular maintenance appointments to upkeep the benefits. Overall, the combination of improved foot condition, relaxation, and pampering makes jelly pedicures a highly satisfying spa trend for many customers.

Safety and Hygiene

safety measures and cleanliness

Choose a salon that follows a strict clean tools protocol for your jelly pedicure.

Look for FDA-approved jelly powder to guarantee a safe and hygienic experience.

Confirm technicians are properly trained in jelly pedicure procedures to maintain high standards of safety and hygiene.

Clean Tools Protocol

Prioritizing cleanliness and hygiene when it comes to jelly pedicures is crucial for guaranteeing a safe and enjoyable spa experience. To elevate your spa experience, make certain the salon you choose follows strict cleanliness protocols for tools. It's vital that all tools used during your jelly pedicure are clean and sanitized to prevent any risk of infections.

Advertisement

Look for salons that go the extra mile by using disposable liners in foot tubs, ensuring a hygienic environment for your treatment.

Additionally, verify that the technicians performing your jelly pedicure are well-trained in the specific procedures involved. This will ensure that proper safety protocols are followed throughout your treatment. Confirm that the jelly powder being used is FDA-approved to guarantee it's safe for application on your skin.

If you have any allergies or skin sensitivities, be sure to communicate this with the salon beforehand to secure a safe and comfortable experience.

Fda-Approved Products

Verifying that the jelly powder used in your pedicure is FDA-certified is essential for maintaining safety and hygiene standards during your spa treatment.

When selecting a salon for a jelly pedicure, here are some key points to keep in mind:

Advertisement
  1. Check for FDA-Certified Products: Prioritize salons that use jelly powder products that are FDA-certified to ensure they meet safety and quality standards.
  2. Hygiene Practices: Look for salons that prioritize hygiene by using clean and sanitized tools for the jelly pedicure, reducing the risk of infections.
  3. Technician Training: Make sure technicians are trained in proper jelly pedicure procedures to guarantee a safe and effective experience.
  4. Disposable Liners: Choose salons that provide disposable liners for foot tubs, as they help prevent the spread of bacteria and maintain cleanliness throughout the treatment.

Technician Training Standards

How well are technicians trained in safety and hygiene standards for performing jelly pedicures?

Technicians performing jelly pedicures must be well-versed in safety and hygiene protocols to guarantee a clean and safe experience for clients. It's essential that they use clean and sanitized tools throughout the pedicure process to prevent infections and skin irritations.

Salons should also provide disposable liners for foot tubs to maintain cleanliness and prevent cross-contamination between clients. Additionally, the jelly powder used in the pedicure should be FDA-approved, ensuring quality and safety for all clients.

If you have allergies or skin sensitivities, it's vital to consult with the salon before the pedicure to ensure that the products used are suitable for your specific needs. By adhering to these standards, technicians can provide a relaxing and safe jelly pedicure experience for you and other clients.

Customer Reviews

happy with purchase highly recommended

For prospective clients curious about the jelly pedicure experience, customer reviews offer valuable insights into the benefits and satisfaction levels of this spa treatment. Here are some typical comments from individuals who've tried jelly pedicures:

  1. Many clients notice a significant improvement in the texture of their feet post-treatment, with reports of softer and smoother skin being quite common.
  2. Positive feedback frequently highlights the relaxation and pampering aspects of the jelly pedicure, making it a soothing experience for many.
  3. Some customers enjoy the temporary cooling sensation provided by the jelly, adding an extra layer of refreshment to the pedicure session.
  4. Those with dry or cracked heels often find jelly pedicures particularly beneficial, as the treatment helps hydrate and nourish the skin in these troublesome areas.

Before booking your own jelly pedicure, consider checking online reviews or asking for testimonials at the salon to gather more insights from previous clients.

Frequently Asked Questions

What Does a Jelly Pedicure Include?

A jelly pedicure includes soaking your feet in a jelly mixture to soften the skin, followed by nail shaping, cuticle care, scrub, massage, and nail polish application. The process typically lasts 45-60 minutes, with prices varying by salon.

What Is Crystal Jelly Pedicure?

To experience a crystal jelly pedicure, you soak your feet in a hydrating mixture infused with oils and extracts. This treatment softens calluses, exfoliates skin, and enhances foot health. Enjoy the soothing and cooling sensations for a luxurious spa experience.

Advertisement

What Is the Difference Between a Gel Pedicure and a Regular Pedicure?

When it comes to nail care, knowing the contrast between a gel pedicure and a regular one is key. Gel pedicures last longer, resist chipping, and require special removal, while regular pedicures chip sooner but are easily removed.

How Long Will a Gel Pedicure Last?

A gel pedicure typically lasts between 2 to 4 weeks, depending on factors like nail growth and maintenance. The gel polish is cured under a UV or LED light, providing a long-lasting and chip-resistant finish.

Conclusion

You've gotta try a jelly pedicure! Not only does it leave your feet feeling silky smooth, but it also provides a unique and relaxing spa experience.

And don't worry about the jelly being messy – it's easy to clean up and totally worth it for the results.

So treat yourself to this trendy spa treatment and pamper your feet like never before!

Advertisement
Continue Reading
Advertisement

Fashion and Lifestyle

Nail Art 101: What Is a Gel Overlay and Why You Need It

Finding the perfect nail enhancement technique can be a game-changer for your nail health and style, but what makes gel overlays a standout option?

Published

on

gel overlay for nail art

You're probably curious about gel overlays, a popular nail enhancement technique. In essence, a gel overlay involves applying a thin layer of hard builder gel onto your natural nails, providing protection, enhancement, and prevention of breakage and peeling. This odorless, healthier alternative to acrylics promotes nail health and longevity, offering a natural look and feel. With minimal filing and curing process, gel overlays excel in application, durability, and appearance. As you explore the world of gel overlays, you'll discover the benefits and possibilities, from design options to maintenance and care, and learn how to achieve the nail look you desire.

Key Takeaways

  • A gel overlay is a thin layer of hard builder gel applied onto natural nails for protection, enhancement, and a natural look.
  • Gel overlays are odorless, promote nail health, and offer versatility in colors and finishes, making them a healthier alternative to acrylic overlays.
  • Preparation involves removing old polish, pushing back cuticles, cleansing, and shaping nails, while maintenance requires regular appointments and necessary repairs.
  • Gel overlays provide a long-lasting finish, are lightweight, and prevent breakage and peeling, making them ideal for nail art and design.
  • With proper application and care, gel overlays can promote healthy nail growth and longevity, making them a must-have for nail care enthusiasts.

What Is a Gel Overlay?

When you opt for a gel overlay, you're essentially applying a thin layer of hard builder gel directly onto your natural nails, without adding any length or tips. This means that your natural nail shape and size remain intact, while still benefiting from the protection and enhancement that gel overlays provide.

Essentially, a gel overlay is a way to strengthen and beautify your natural nails without altering their natural shape or length. By applying a thin layer of hard builder gel, you're creating a shield that protects your natural nails from breakage and peeling, while also giving them a glossy and natural finish.

This process is lightweight, providing a more natural look and feel compared to other nail extension methods. With a gel overlay, you can rest assured that your natural nails are well-protected and looking their best.

Benefits of Gel Overlays

advantages of gel nails

By choosing a gel overlay, you're not only strengthening your natural nails but also opening yourself up to a multitude of benefits that enhance their overall health and appearance. For starters, gel overlays offer an odourless application process, making them a preferred choice for those sensitive to strong chemical smells. Additionally, they're healthier for your natural nails compared to acrylic overlays, as they require less filing, reducing the risk of damage.

With gel overlays, you can enjoy versatile colours and finishes, allowing for a wide range of customization options to suit your individual preferences. The result is a glossy and natural finish that provides a polished look while enhancing the strength and durability of your natural nails. Plus, less filing of your natural nails is required for gel overlays, making them a gentler option that promotes nail health and longevity.

How Gel Overlays Differ

comparing differences in overlays

When delving into the realm of nail enhancements, it's crucial to grasp how gel overlays differentiate from other options. Gel overlays distinctly excel compared to acrylics in application, durability, and overall appearance.

Now, let's dissect the main distinctions that distinguish gel overlays, beginning with their enduring finish.

Advertisement

Gel Vs Acrylic

What sets gel overlays apart from acrylics, and why are they the preferred choice for a more natural look and feel?

For starters, gel overlays use hard builder gel, which adds an extra layer of protection and durability to your nails. This is in contrast to acrylics, which can be harsh on your nails due to the stronger chemicals used. As a result, gel overlays are a gentler option for those with sensitive nails.

While they may be more expensive than acrylic overlays, the benefits are well worth the extra cost. When you opt for a gel overlay, you can expect a more natural appearance and a longer-lasting finish, thanks to the curing process under a UV lamp. This process establishes a strong bond between the gel and your nail, making it less prone to chipping or cracking.

Lasting Finish

You'll notice that gel overlays provide a lasting finish, which sets them apart from other nail enhancement options and makes them a popular choice for those seeking a durable, high-gloss look. This finish is a result of the unique application process, which requires minimal filing of your natural nails, making it a gentler option.

Unlike acrylic overlays, gel overlays don't have a strong odor, making the application process more pleasant. With a wide range of colors and finishes available, you can customize your look to fit your style. The lasting finish of gel overlays is also due to their ability to promote healthier nail growth and maintenance. They're a great option for those who want a long-lasting, high-gloss finish without compromising the health of their natural nails.

Advertisement

With proper care, your gel overlay can last for weeks, making it a convenient and low-maintenance option. Overall, the lasting finish of gel overlays makes them a popular choice for those seeking a durable, high-gloss look.

Preparing for a Gel Overlay

nail tech applying gel

Before applying a gel overlay, remove old nail polish and push back your cuticles to guarantee a clean slate for the application process. This establishes a strong bond between your natural nails and the gel overlay, allowing for a long-lasting finish.

To achieve the best results, it's crucial to prepare your nails properly. Here are some key steps to follow:

  1. Cleanse your nails: Remove oils and lotions to prevent interference with the gel overlay's adhesion.
  2. Shape your nails: Gently file your nails to your desired shape, taking care not to file too much, as this can weaken your natural nails.
  3. Push back cuticles: Gently push back your cuticles to prevent them from getting in the way of the gel overlay application.
  4. Dry your nails: Ensure your nails are completely dry before applying the gel overlay to prevent moisture from affecting the bonding process.

The Gel Overlay Process

detailed overview of process

Now that you're ready to start the gel overlay process, it's time to focus on the key steps that'll give you the desired results.

You'll begin by prepping your natural nail, ensuring a clean slate for the gel application.

Next, you'll apply the gel overlay, followed by the finishing touches that'll leave your nails looking salon-fresh.

Prep the Nail

As you begin the gel overlay process, gently buff the surface of your natural nail to remove shine and create a rough texture, allowing the gel to adhere securely. This vital step sets the foundation for a long-lasting and durable gel overlay. By roughening the surface of your natural nail, you're establishing a strong bond between the nail and the gel, guaranteeing a longer wear.

Advertisement

Here are the essential steps to prep your nail:

  1. Gently buff the surface of your natural nail to remove shine and create a rough texture.
  2. Apply a bonder or primer to the natural nail to ensure the gel overlay adheres securely and lasts longer.
  3. Apply a base coat of gel to the natural nail before curing it under a UV or LED lamp to create a strong foundation for the overlay.
  4. Ensure the nail is clean and dry, free of any oils or lotions, to establish a strong bond between the nail and the gel.

Apply Gel Overlay

With your natural nail properly prepped, you're ready to apply the gel overlay, a process that involves building up thin layers of hard builder gel to add strength and protection. This step is vital in creating overlay nails that offer a natural look and feel.

To begin, apply a thin layer of clear base coat to your prepared nail, making sure to cover the entire surface. Next, use a UV lamp to cure the layer for the recommended time. This step is necessary in creating a strong bond between the gel and your nail.

Continue building up thin layers of hard builder gel, curing each layer with the UV lamp, until you achieve the desired thickness. Remember to finish with a thin layer of top coat to seal and protect your gel overlay.

Finishing Touches

You're in the final stretch of the gel overlay process, where a few finishing touches will transform your nails into stunning, long-lasting masterpieces. The final steps involve shaping and refining the gel overlay to perfection. This is where the magic happens, and your nails are transformed into a work of art.

Here are the essential finishing touches to complete your gel overlay:

Advertisement
  1. Shaping and refining: Use a nail file to gently shape and refine the gel overlay, ensuring a smooth, even finish.
  2. Top coat application: Apply a glossy top coat to seal and protect the gel overlay, adding an extra layer of shine and durability.
  3. Finishing touches: Use a lint-free wipe to gently remove any excess gel or oils from around the cuticles and nail bed.
  4. Final inspection: Inspect your nails under a Deluxe Laser lamp to detect any imperfections or areas that require touch-ups.

Caring for Your Gel Overlay

gel overlay maintenance guide

Properly caring for your gel overlay requires regular touch-ups to prevent damage and guarantee a long-lasting, salon-fresh finish. You'll need to schedule appointments with your nail technician every two to three weeks to maintain the health and longevity of your overlays.

During these appointments, your technician will assess the condition of your nails and perform any necessary repairs or replacements. This regular maintenance is essential to prevent chipping, cracking, or lifting of the gel overlay.

By keeping up with these appointments, you'll be able to enjoy the benefits of gel overlays, including their lightweight and durable nature, which provides added protection to prevent breakage, splitting, or peeling. Remember, gel overlays are a long-term investment, and with proper care, they can last for several months.

Gel Overlay Vs Gel Extensions

comparing gel nail treatments

When contemplating your nail enhancement options, it's crucial to understand the differences between gel overlays and gel extensions.

You might be wondering, which one is right for you? Let's break down the key differences between these two popular nail treatments, so you can make an informed decision that suits your nail needs.

Key Differences

When it comes to nail enhancements, sorting out the differences between gel overlays and gel extensions is essential, since they cater to distinct needs and preferences. You may be wondering, what sets them apart?

Here are the key differences to take into account:

Advertisement
  1. Length: Gel extensions add length to your natural nails, while gel overlays maintain your natural nail length.
  2. Purpose: Gel overlays provide added strength and protection to your natural nails, whereas gel extensions offer durability and flexibility with added length.
  3. Maintenance: Gel overlays require less maintenance than gel extensions, making them a convenient option for those seeking enhanced natural nails.
  4. Commitment: Gel overlays are ideal for individuals looking to reinforce their natural nails without the commitment of extensions.

Lasting Results

You can expect a noticeable difference in longevity between gel overlays and gel extensions, with the former typically lasting 2-3 weeks on natural nails and the latter persisting for 3-4 weeks with proper care. This difference in duration is important in deciding which option suits you best.

Type Duration Purpose
Gel Overlay 2-3 weeks Strengthen natural nails
Gel Extensions 3-4 weeks Add length and durability
Gel Overlay 2-3 weeks Ideal for nail strengthening
Gel Extensions 3-4 weeks Preferred for added length

When choosing between a gel overlay and gel extensions, consider your personal preferences, nail health, and desired maintenance routine. If you want to strengthen your natural nails without added length, a gel overlay is the way to go. However, if you're looking for longer nails with added durability, gel extensions are the better choice. By understanding the lasting results of each option, you can make an informed decision that suits your needs.

Design Options and Ideas

creative design possibilities explored

With gel overlays, you can tap into your creativity and explore a vast array of design options that cater to your unique style and preferences. Overlays need not be limited to simple, solid colors – the possibilities are endless!

Here are just a few design options to get you started:

  1. French tips: Add a touch of elegance with crisp, white tips that complement any outfit.
  2. Gradient effects: Gradually shift from one color to another for a mesmerizing, multi-tonal look.
  3. Glitter accents: Add some sparkle and shine with subtle or bold glitter accents that catch the light.
  4. Intricate nail art designs: Get creative with stamping, marbling, or freehand painting techniques to create one-of-a-kind masterpieces.

With gel overlays, you can customize your nail art with a wide range of colors, textures, and finishes to suit your individual style. From subtle and understated to bold and eye-catching, the design options are truly limitless.

Whether you're looking for a classic, timeless look or a trendy, statement-making design, gel overlays provide the perfect canvas for your creativity.

Common Gel Overlay Mistakes

common gel overlay errors

As you experiment with gel overlays, it's equally important to be mindful of the common mistakes that can compromise the quality and longevity of your nail art.

One common mistake is applying gel overlays on weak, damaged nails, which can lead to lifting and premature chipping.

You should also avoid incorrect curing times or inadequate lamp strength, as this can result in gel overlay peeling or cracking.

Advertisement

Skipping proper nail preparation steps like dehydration and priming can also cause gel overlays to lift.

Additionally, using expired or low-quality gel products can compromise the longevity and quality of your gel overlays.

Lastly, be cautious not to over-file or excessively buff your natural nails before applying gel overlays, as this can weaken the nail structure and lead to breakage.

Maintaining Healthy Nails

taking care of nails

Regular gel overlay maintenance appointments become an essential shield against nail damage, ensuring your natural nails stay healthy and strong. With regular appointments, you can prevent common nail problems like breakage, splitting, or peeling. Gel overlays provide a protective layer that safeguards your natural nails from damage, promoting overall nail health.

Here are some benefits of gel overlays for maintaining healthy nails:

  1. Less filing: Gel overlays require less filing of your natural nails, preserving their integrity.
  2. Odourless application: The application process is odourless, making it a more comfortable experience for you.
  3. Gentle chemicals: Gel overlays use milder chemicals compared to acrylic overlays, making them a gentler option for nail enhancement.
  4. Natural finish: Gel overlays offer a glossy and natural finish, enhancing the appearance of your nails while maintaining their health.

Frequently Asked Questions

What Is the Point of Gel Overlays?

You're wondering what's the point of gel overlays? Well, they provide a protective shield, preventing breakage and promoting healthier nail growth, while also offering customization options and a natural look that's lightweight and long-lasting!

What Does Overlay Do to Your Nails?

You'll be amazed to know that 80% of women experience nail breakage; a gel overlay helps! It strengthens and protects your natural nails, promoting healthy growth, and adds a glossy finish, all while allowing for customization with various colors and finishes.

Advertisement

Which Is Better, Acrylic or Gel Overlay?

You're wondering which overlay is better, acrylic or gel? Honestly, gel overlays are the way to go – they're odorless, gentler on your nails, and offer a natural finish, making them a superior choice for nail health and style.

What Is the Difference Between Hard Gel and Overlay?

You're wondering what sets hard gel apart from overlay – hard gel is used for nail extensions, whereas gel overlay adds a protective layer to your natural nails without extending their length.

Conclusion

As you now know, gel overlays are a game-changer for your nail game. With their long-lasting, high-gloss finish and versatility in design, it's no wonder they're a popular choice.

By following the tips and tricks outlined above, you'll be well on your way to achieving salon-quality nails from the comfort of your own home. With a little practice and patience, your nails will be the envy of all your friends, shining bright like a beacon of nail art excellence.

Advertisement
Continue Reading

Fashion and Lifestyle

The Classic Tuxedo: Timeless Elegance for Any Occasion!

Timeless elegance meets modern flair with the classic tuxedo – a must-have for any occasion!

Published

on

elegant tuxedo for all

The classic tuxedo radiates timeless grace, suitable for any event! With satin lapels, single buttons, and sleek design, it displays refined style effortlessly. Coordinate with a white dress shirt, black bow tie, and accessories like cufflinks for added flair. Modern trends allow for personalization and experimentation, enhancing the classic look. Tuxedo accessories like cufflinks, studs, and pocket squares add the final touch of sophistication. Ensure proper fit and quality fabric for a polished appearance at formal events. Discover more about the historical significance, anatomy, and styling tips to elevate your tuxedo game!

Key Takeaways

  • Originating in the 1860s, the classic tuxedo symbolizes timeless elegance at formal events.
  • Lapels with satin, single-button style, and tailored fit define the tuxedo's refined details.
  • Coordinating shirt, bow tie, and accessories enhance the tuxedo's sophistication.
  • Modern trends include slim-fit silhouettes, bold colors, and personalized touches for a contemporary look.
  • Key elements like cufflinks, studs, cummerbunds, and pocket squares elevate the tuxedo ensemble.

Historical Significance and Evolution

The historical journey of the classic tuxedo, from its origins in the 1860s to its prominence at black-tie events, showcases its evolution and enduring appeal. With a rich history steeped in elegance and sophistication, the classic tuxedo has transcended time, symbolizing timeless elegance and refined style.

Originally emerging as formal eveningwear, the tuxedo suit underwent an evolution that led to its widespread recognition and adoption at black-tie events.

The historical significance of the classic tuxedo lies in its ability to exude class and charm, making it a fashion statement that has stood the test of time. Its evolution from a niche attire to a staple in formal events speaks volumes about its cultural impact and enduring relevance.

Understanding the journey of the classic tuxedo reveals not only its sartorial evolution but also its symbolic importance in representing a standard of elegance and sophistication that remains unparalleled.

Anatomy and Details of Tuxedo Suit

elegant tuxedo suit features

Exquisite workmanship and meticulous attention to detail define the anatomy and intricate features of a tuxedo suit. When it comes to the construction of a tuxedo suit, several key elements play an essential role in creating its sophisticated and timeless appeal. Here's a breakdown of the vital components:

Elements Description
Lapels The lapels of a tuxedo jacket, often adorned with satin, add a touch of luxury and formality to the ensemble.
Buttons The number and style of buttons on a tuxedo jacket can vary, with single-button closures being a popular choice for a sleek and modern look.
Vents Vents, or lack thereof, on the back of the jacket can influence the fit and style, with ventless designs offering a clean and tailored appearance.
Pockets Thoughtfully placed pockets on a tuxedo jacket provide both functionality and aesthetics, allowing for a seamless look.
Tailored Jackets Tailored jackets are essential for a well-fitted tuxedo suit, emphasizing the wearer's silhouette and ensuring a polished appearance.
Satin Stripes Black trousers with satin stripes are a classic feature of a tuxedo suit, adding a subtle contrast and elegance to the overall look.

Shirt, Bow Tie, Accessories Coordination

stylish outfit coordination details

When coordinating your formal accessories, remember to harmonize your shirt and bow tie for a stylish tuxedo look.

Opt for a crisp white dress shirt with French cuffs and a wing collar as your base.

Advertisement

Choosing a black silk or satin bow tie adds elegance and complements the lapel fabric seamlessly.

Coordination of Formal Accessories

To achieve a polished and stylish look with your tuxedo suit, focus on coordinating your formal accessories such as the shirt, bow tie, and other accompanying details. Opt for a crisp white dress shirt with French cuffs to elevate the ensemble, paired with a black silk or satin self-tie bow tie that complements the lapel material.

Adding subtle elegance, carefully selected cufflinks, pocket squares, and stud sets complete the formal look. Additionally, consider incorporating accessories like cummerbunds, waistcoats, and dress watches to add sophistication and a touch of personal style to your tuxedo attire.

Harmonizing Shirt and Bow Tie

Proper coordination of the shirt, bow tie, and accompanying accessories is essential for achieving a sophisticated and cohesive tuxedo ensemble. When selecting a shirt to complement your tuxedo, opt for a classic white formal shirt for timeless elegance. This crisp base allows the bow tie to stand out as a focal point of your outfit.

The bow tie should harmonize with the color scheme of your tuxedo, creating a balanced and polished look. Consider coordinating your cufflinks with your bow tie for a harmonious touch. These small details can make a significant impact on your overall appearance.

Advertisement

Accessories like cufflinks, studs, and pocket squares should enhance your ensemble without overpowering it. Remember, the goal is to achieve a refined and cohesive tuxedo outfit that exudes sophistication. Master the art of coordinating your shirt, bow tie, and accessories to elevate your classic tuxedo suit to the next level of elegance.

Stylish Tuxedo Accessories

Ensure your tuxedo accessories, including the shirt, bow tie, and accompanying details, are seamlessly coordinated to elevate your overall look to the pinnacle of sophistication. When selecting accessories for your tuxedo, focus on elements like cufflinks, studs, and pocket squares to enhance the ensemble's elegance. These small details can make a significant impact on your overall appearance.

Additionally, consider incorporating cummerbunds or waistcoats to add a touch of refinement to your outfit. A well-chosen dress watch can also contribute to the sophistication of your look.

To further enhance your tuxedo ensemble, don't overlook the significance of lapel pins or boutonnieres. These subtle additions can bring a unique flair to your outfit and showcase your attention to detail.

Occasions and Modern Trends

celebrating milestones with style

For occasions where style and sophistication are key, contemplate integrating modern trends into your tuxedo attire. When aiming to make a statement at formal events, embrace modern variations while maintaining the timeless appeal of the classic black tuxedo. To achieve a polished look with an air of elegant sophistication, here are some key elements to take into account:

  • Slim-fit Silhouettes: Opt for a tuxedo suit with a tailored, slim-fit silhouette to exude modern elegance.
  • Bold Colors and Textures: Experiment with colors beyond traditional black and incorporate rich textures like velvet and jacquard for a contemporary twist.
  • Personalized Details: Add personalized touches such as monograms or unique buttons to showcase your individual style.
  • Shawl Collar Designs: Choose tuxedos with shawl collar designs for a sophisticated and fashion-forward look.
  • Tailored Silhouettes: Embrace tailored silhouettes that enhance your body shape and offer a modern take on classic tuxedo styles.

Importance of Tuxedo Accessories

elevating style with accessories

Enhance your tuxedo ensemble with crucial accessories that add sophistication and personal flair to your overall look. Tuxedo accessories like cufflinks, studs, cummerbunds, and pocket squares are essential finishing touches that elevate the classic tuxedo suit. These accessories provide subtle details that play a significant role in completing the timeless elegance of your outfit.

Consider the following table for a quick overview of the key tuxedo accessories:

Advertisement
Tuxedo Accessories Description
Cufflinks Add a touch of luxury and style to your shirt cuffs.
Studs Replace buttons on your dress shirt for a polished look.
Cummerbunds Accentuate your waistline and provide a sleek finish to your tuxedo.
Pocket Squares Inject personality and color into your ensemble with a well-folded pocket square.

Opt for silver or gold accents in these accessories to complement your tuxedo without overshadowing it. Remember, well-coordinated accessories not only add sophistication but also allow for self-expression and style customization.

Foundations of Black Tie

elegance in formal attire

You must grasp the crucial components of black tie attire to embody timeless sophistication. Understanding the dress code essentials and key attire elements is fundamental to mastering the classic tuxedo look.

The jacket, trousers, shirt, bow tie, and accessories all play a pivotal role in creating a polished black tie ensemble.

Dress Code Essentials

Mastering the foundations of black tie attire is crucial for understanding the key components of a classic tuxedo ensemble. When it comes to dress code essentials for formal occasions, the tuxedo suit is your go-to choice for making a fashion statement. Here are the key elements to keep in mind:

  • Jacket: The cornerstone of your ensemble, featuring lapels, buttons, and vents that contribute to the overall look.
  • Trousers: Tailored to perfection for an ideal fit, complementing the jacket seamlessly.
  • Dress Shirt: A crisp white shirt with a wing collar and French cuffs provides a sophisticated backdrop for accessories.
  • Bow Tie: Opt for a self-tie bow tie to add refinement and personality to your look.
  • Accessories: Complete your ensemble with cufflinks, pocket squares, and stud sets to express personal style elegantly.

Understanding these essentials will guarantee you're impeccably dressed for any black-tie affair.

Key Attire Elements

Understanding the foundational elements of black tie attire is necessary for confidently donning a classic tuxedo ensemble. The classic tuxedo comprises a black jacket, trousers, dress shirt, bow tie, and accessories, all important for formal occasions.

To achieve a polished look and timeless elegance, pay attention to intricate details such as lapels, buttons, vents, and pockets on the jacket and trousers. These elements contribute to the overall sophistication of the ensemble. Additionally, ensuring the proper fit, high-quality fabric, and tailored aspects of each component are essential for a refined appearance.

Advertisement

The classic tuxedo embodies tradition and class, making it a timeless choice suitable for various formal events. By mastering the key attire elements of a classic tuxedo, you can exude confidence and sophistication at any black-tie affair.

The Jacket Details

capturing jacket s unique features

When examining the tuxedo jacket details, the satin or grosgrain lapels stand out as luxurious accents that elevate the overall look. The tuxedo jacket typically comes in black or midnight blue, exuding sophistication and elegance.

Here are some key features to contemplate:

  • Satin Lapels: The smooth satin lapels add a touch of elegance to the jacket, catching the light and creating a sophisticated contrast.
  • Grosgrain Lapels: For a more textured look, grosgrain lapels provide a subtle yet refined detail to the tuxedo ensemble.
  • Single Button Closure: The single button closure offers a sleek and minimalist appearance, perfect for a classic and timeless style.
  • Ventless Back Design: With a ventless back design, the jacket maintains a clean and polished aesthetic, enhancing the overall silhouette.
  • Refined Appearance: When selecting a tuxedo jacket, focus on the fit, lapel style, and fabric quality to achieve a refined and distinguished look for any formal occasion.

The Trousers and Dress Shirt

men s formal outfit description

Taking center stage in the classic tuxedo ensemble are the sleek trousers and crisp white dress shirt, each playing an essential role in achieving a polished and formal look. The black tuxedo trousers are crafted to be sleek and understated, often featuring satin side stripes that add a touch of elegance. Paired with a crisp white dress shirt, preferably with French cuffs and a wing collar, the ensemble exudes sophistication suitable for formal occasions. The dress shirt may also include pleats or a bib front, providing elegant detailing that complements the tuxedo jacket seamlessly.

To highlight the key elements of tuxedo trousers and dress shirts, refer to the table below:

Tuxedo Trousers Crisp White Dress Shirt
Sleek design French cuffs
Satin side stripes Wing collar
Made from matching fabric Pleats or bib front

Frequently Asked Questions

What Is the Most Classic Tuxedo?

For the most classic tuxedo, opt for black or midnight blue with single-button closure and satin or grosgrain lapels. Guarantee a tailored fit, peak lapels, and black trousers with satin stripes for timeless elegance.

What Tuxedo Does James Bond Wear?

You should wear the iconic 'Dinner Jacket' like James Bond. It's a sleek black tuxedo with a peak lapel, a white shirt, a black bow tie, and satin-striped trousers. This ensemble exudes timeless elegance for any occasion.

Advertisement

What Is the Meaning of Classic Tuxedo?

When you ask about the meaning of a classic tuxedo, it's all about timeless style and sophistication. This formal ensemble, with its tailored jacket, matching trousers, and elegant accessories, exudes refinement and charm at any special occasion.

What Occasion Is Appropriate for a Tuxedo?

For you, a tuxedo is perfect for sophisticated events like black-tie galas and formal weddings. It elevates your style, showing respect for the occasion and adding an air of elegance. Stand out and celebrate in style!

Conclusion

So, next time you're getting dolled up for a swanky event, don't forget to rock that classic tuxedo!

With its timeless elegance and suave vibes, you'll be turning heads and stealing the show.

Just make sure to throw on your spiffy cufflinks and pocket square for that extra touch of class.

Advertisement

Remember, a well-fitted tux never goes out of style, so embrace the dapper charm and let your confidence shine like a disco ball!

Continue Reading

Fashion and Lifestyle

What Is Thick Water? The Hydration Solution Explained!

Discover how Thick Water, a hydration solution for swallowing difficulties, offers a safer option for hydration with its unique thickening properties.

Published

on

thick water for hydration

Thick water is water with a thickening substance added to aid in swallowing for individuals with conditions like dysphagia. It reduces the risk of choking and aspiration pneumonia, ensuring safer hydration. Made by mixing water with a powder or gel to create a texture that is easier to swallow. The Thick-It Clear Advantage provides specific thickness options for an essential hydration solution. It guarantees a consistent texture and is convenient to use. Discover more about its benefits and impact on body hydration.

Key Takeaways

  • Thick water is water thickened with substances like powder or gel for easier swallowing.
  • It reduces the risk of choking and aspiration pneumonia, especially for individuals with swallowing difficulties.
  • Thick water maintains hydration levels and aids in preventing dehydration in those with dysphagia.
  • Different types of thickened water can influence body hydration and thirst sensation.
  • Thick-It Clear Advantage offers nectar consistency thickened water for specific thickness needs.

Benefits of Thick Water

Reducing the risk of aspiration pneumonia and choking, thick water offers essential benefits for individuals with swallowing difficulties. Thickened liquids like thick water help prevent choking, especially for those with a neurological condition that affects their ability to swallow effectively.

By providing a consistent thickness, thick water ensures a safer swallowing experience, allowing individuals to drink water without the fear of aspiration.

In addition to reducing the risk of choking, thick water also helps individuals with dysphagia maintain proper hydration levels. This is essential for overall health and well-being, as dehydration can lead to various complications, particularly in individuals with swallowing difficulties.

How Thick Water Is Made

density of homemade water

To produce thick water, a thickening substance like powder or gel is added to water, resulting in a pudding-like texture that aids in easier swallowing.

Here's how thick water is prepared:

  1. Select Your Thickening Substance: Choose between powder or gel-based thickening substances. Powdered choices are convenient and have a longer shelf life, while gel-based options offer a different texture.
  2. Adjust Texture: The quantity of thickening substance used determines the final texture of the thick water. Adding more thickener creates a denser liquid, while using less results in a slightly thinner texture.
  3. Blend Thoroughly and Enjoy: After adding the thickening substance to the water, mix it well to make sure it's fully integrated. Then, you're ready to drink your thickened liquid and enjoy the advantages of easier swallowing.

Thick-It Clear Advantage Overview

thickening gel for swallowing

Thick-It Clear Advantage offers nectar consistency thickened water for individuals who require specific thickness levels for easier consumption. This thickened water is a game-changer for those facing difficulty swallowing liquids.

Clear Advantage, available for purchase at Cart Health, guarantees a consistent texture that aids in preventing dehydration in individuals with dysphagia. By maintaining a steady thickness in the water, it also reduces the risk of choking, providing peace of mind during drinking.

Advertisement

The product's convenient packaging makes it simple to use and store, catering to daily hydration needs effortlessly. For those seeking a reliable solution to make drinking safer and more manageable, Thick-It Clear Advantage stands out as a practical choice.

Say goodbye to struggles with maintaining hydration and hello to a smoother drinking experience with Clear Advantage.

Benefits of Thick Water

thickened water for swallowing

Switching gears to the benefits of thick water, users experience improved safety and hydration, making it a valuable choice for individuals with swallowing difficulties.

When opting for thickened liquids, you can:

  1. Reduce the Risk of Aspiration Pneumonia: Thick water helps to minimize the chances of aspiration pneumonia in individuals with swallowing difficulties, promoting better respiratory health and overall well-being.
  2. Maintain Proper Hydration Levels: For those facing swallowing challenges, thickened beverages play an essential role in preventing dehydration, ensuring that the body remains adequately hydrated throughout the day.
  3. Enhance Swallowing Safety: By providing a consistent thickness, thick water lowers the risk of choking during swallowing, allowing individuals with dysphagia to consume fluids more comfortably and securely.

Thick water serves not only as a hydration solution but also as a supportive aid in managing swallowing difficulties, offering a practical and beneficial option for individuals with specific needs.

Thirstiness and Body Hydration Study

researching thirst and hydration

In the study examining thirstiness and body hydration, the stability of oral mucosa hydration over 3 hours without drinking was observed. Researchers found that different types of thickened water influenced body hydration and thirst sensation.

While thickened water helped maintain hydration levels, it mightn't alleviate thirst like regular water does. Thirst, dry mouth, and the desire to drink showed significant variations with different stimuli in the study.

Surprisingly, water intake saw an increase after 90 minutes when individuals consumed a starch-based thickener according to the research. These findings highlight the complex relationship between thickened liquids, body hydration, and thirst sensation.

Advertisement

Understanding how these factors interact can provide valuable insights for individuals who rely on thickened water for hydration purposes. Ultimately, the study sheds light on the importance of considering both hydration maintenance and thirst satisfaction when managing hydration with thickened water.

Frequently Asked Questions

Is Thick Water Actually Hydrating?

Yes, thick water can be hydrating, but it might not quench your thirst like regular water. Different thickened water types affect hydration and thirst sensation. If you dislike it, you may need more time to drink it.

Why Do People Drink Thickened Water?

You drink thickened water to manage swallowing difficulties and lower the risk of aspiration pneumonia. It promotes safer swallowing for conditions like stroke or Parkinson's. The pudding-like consistency aids consumption, prevents choking, and helps maintain hydration and nutrition levels.

What Is the Meaning of Thick Water?

Thick water is water thickened with a powder or gel to assist those with swallowing difficulties. It's commonly used for dysphagia, aiding in preventing aspiration pneumonia by ensuring liquids are safely swallowed.

How to You Make Thick Water?

To make thick water, you combine regular water with a thickening agent, adjusting to reach the desired consistency. Take care not to overdo it, as too much thickener can make the water too gloopy to drink easily.

Advertisement

Conclusion

Just like Thick Water provides a solution for those with swallowing difficulties, it also symbolizes the importance of finding alternative ways to overcome challenges.

By adapting and innovating, we can find new ways to stay hydrated and nourished, even in the face of obstacles.

Let Thick Water serve as a reminder that perseverance and creativity can lead to unexpected solutions in our daily lives.

Continue Reading

Trending

Copyright © 2024 Feature Buddies Affiliate disclaimer As an affiliate, we may earn a commission from qualifying purchases. We get commissions for purchases made through links on this website from Amazon and other third parties.